
Asset Tracking
The Asset Tracking module gives correctional facility administrators a unified system for managing every piece of equipment, tool, and property assigned to or within the facility. From kitchen utensils and medical devices to electronic tablets and restraint equipment, every asset is catalogued, assigned, and monitored through its full lifecycle — purchase, issuance, maintenance, and disposal. Real-time dashboards and inventory reports eliminate manual spreadsheets and reduce costly losses or compliance gaps.
Live Asset Dashboard
At-a-glance KPIs showing total assets, items in use, items in maintenance, and unaccounted assets across the entire facility.
Full Inventory Management
Add, categorize, and track every asset with serial numbers, purchase dates, assigned locations, and current custodian information.
Inmate Assignment Tracking
Track items issued to individual inmates (tablets, bedding, uniforms) and automatically flag unreturned property at checkout.
Maintenance Scheduling
Schedule and record preventive maintenance events for facility equipment to extend asset life and satisfy inspection requirements.
Export & Audit Reports
Generate PDF and CSV asset reports for state inspections, budget justifications, and annual inventory reconciliation.
Barcode & QR Support
Print and scan barcode labels for rapid asset check-in and check-out without manual data entry, reducing officer workload.
Step-by-Step: Using the Asset Tracking Module
Access the Asset Tracking Module
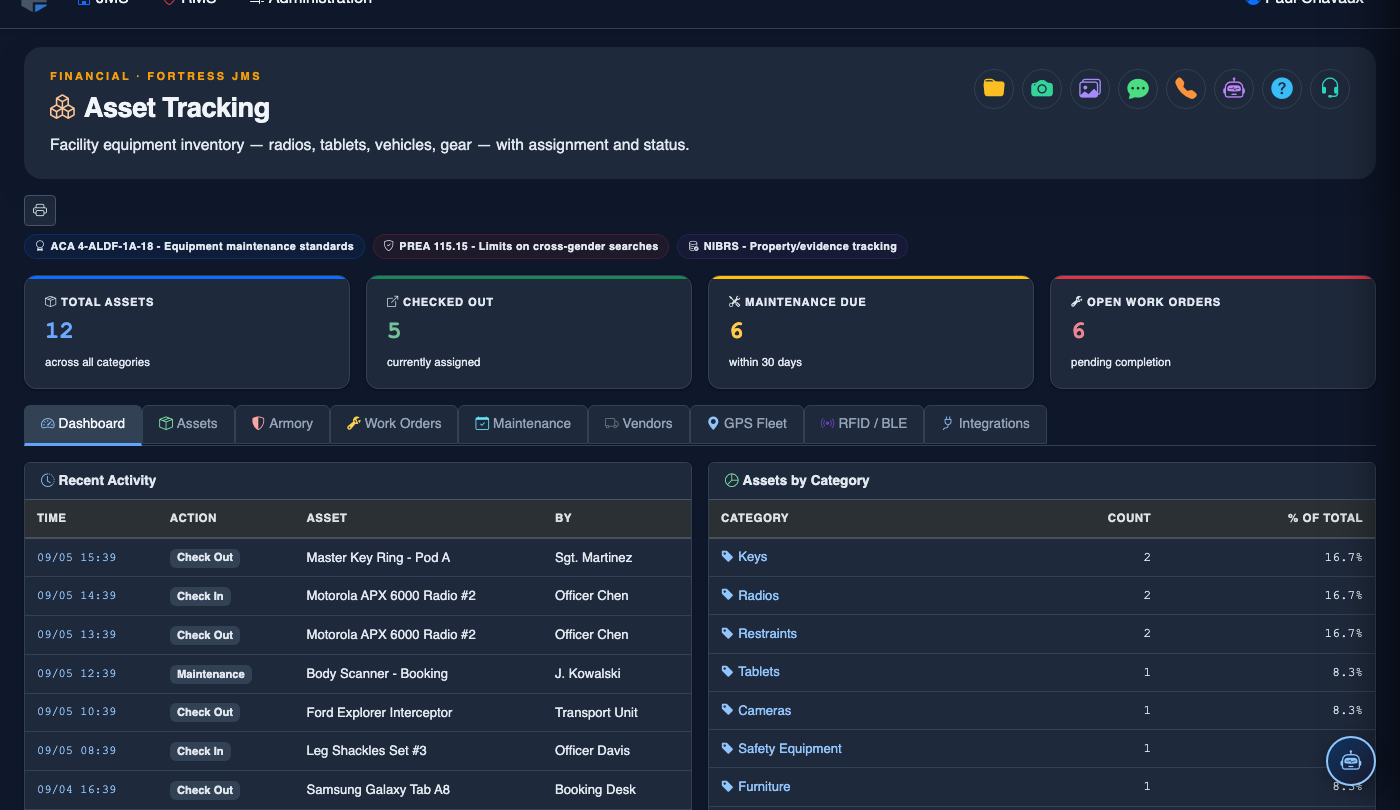
From the Fortress JMS main navigation, click Asset Tracking. The module opens on the Asset Dashboard tab, giving you an instant summary of your facility’s asset health across all categories.
Review the Dashboard KPIs
The dashboard displays key metrics: Total Assets, Assigned to Inmates, In Maintenance, and Unaccounted. Any red or amber KPI cards indicate items requiring immediate attention.
Add a New Asset to Inventory
Navigate to the Asset Inventory tab and click + Add Asset. Fill in the Name, Category, Serial Number, Purchase Date, Cost, and Storage Location. Assign an initial status of Available and click Save.
Issue an Asset to an Inmate
From the asset’s detail record, click Assign to Inmate. Search for the inmate by name or booking number, confirm the assignment, and click Check Out. The system logs the issuing officer, date/time, and the inmate’s electronic acknowledgment.
Schedule Preventive Maintenance
On the asset record, click the Maintenance tab, then Schedule Maintenance. Enter the Maintenance Type, Scheduled Date, and assigned Technician. The asset status automatically updates to In Maintenance on the scheduled date.
Process an Asset Return
When an inmate is released or transferred, open the asset record and click Check In. Confirm the item’s Condition (Good, Damaged, Missing). Damaged or missing items generate an automatic incident note linked to the inmate’s file.
Export Inventory Report for Inspection
Go to the Asset Inventory tab, apply any desired category or status filters, then click Export Report. Choose PDF for formal submissions or CSV for further analysis. The report includes your facility name, report date, and officer signature line.
💡 Pro Tips
- Create asset categories that mirror your facility’s inspection checklist categories (e.g., “Restricted Tools,” “Medical Equipment,” “Inmate Property”) so monthly counts can be completed in minutes.
- Enable barcode label printing for all high-turnover items like tablets and uniforms — it reduces check-out/check-in time from minutes to seconds per item.
- Review the Unaccounted KPI every shift change and assign a specific officer to reconcile it before signing off — unresolved discrepancies at shift end become significantly harder to investigate after the fact.
- Link maintenance records to your facility’s vendor contracts so that warranty claims can be submitted with a complete service history attached.