
Housing & Roster
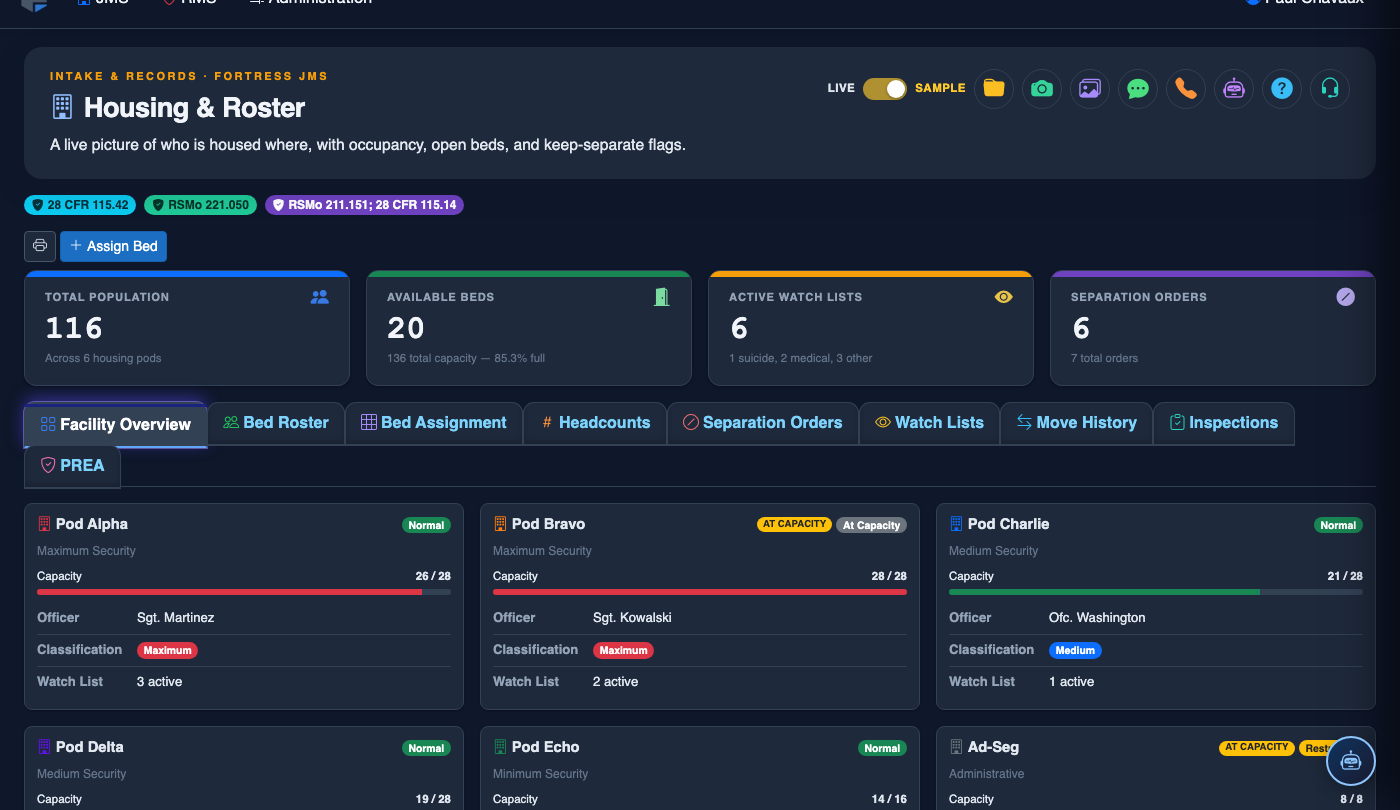
The Housing & Roster module is the operational command center for managing inmate bed assignments, cell occupancy, and facility population across all housing units. Correctional staff use this module to make and track housing assignments, monitor bed availability in real time, perform cell moves, and maintain an accurate, auditable roster of every inmate currently in custody — ensuring safe and compliant facility operations at all times.
Bed Assignment
Assign inmates to specific cells and beds across all housing units with conflict detection for incompatible inmates.
Live Occupancy Dashboard
View real-time bed availability and occupancy percentages for every pod, unit, and cell in the facility.
Cell Moves & Transfers
Process intra-facility cell moves and inter-facility transfers with full audit trail and reason documentation.
Separation Alerts
Automatic alerts prevent co-housing of inmates with active separation orders, gang conflicts, or victim-offender relationships.
Head Count Roster
Generate official count rosters by unit, pod, or entire facility for scheduled and emergency head counts.
Classification-Based Housing
Filter available beds by classification level, gender, medical needs, and special management requirements.
Step-by-Step: Managing Housing Assignments & Roster
Access the Housing & Roster Module
Navigate to Housing & Roster from the main navigation menu. The module opens to the Occupancy Dashboard, displaying a live grid of all housing units. Each unit tile shows the unit name, current occupancy count, total bed capacity, and occupancy percentage. Units near capacity are highlighted in amber; over-capacity units are flagged in red.
Assign a Newly Booked Inmate to a Bed
Click New Assignment or locate the inmate in the Unassigned Inmates queue on the left panel. Click the inmate’s name to open their assignment form. The system pre-filters available beds based on the inmate’s classification level, gender, and any medical housing requirements established during booking intake.
Review Separation Orders Before Assigning
Before confirming a bed selection, review the Separation Alerts panel. This displays any active separation orders between the inmate being assigned and current occupants of the target cell or adjacent cells. If a conflict exists, the system will block the assignment and display the reason. Select an alternative bed to resolve the conflict.
Confirm the Bed Assignment
Select the target Unit, Cell, and Bed from the hierarchical picker. Enter a Housing Reason if required by your facility policy. Click Confirm Assignment to complete the placement. The inmate is immediately removed from the Unassigned queue and appears on the unit roster.
Process an In-Facility Cell Move
To move an already-housed inmate, locate them on the unit roster and click Move. The current assignment is displayed. Select the Move Reason (Disciplinary, Medical, Administrative, Inmate Request), choose the destination bed, and confirm. The system records the move with a timestamp and the processing officer’s credentials for the audit trail.
Generate a Count Roster
Click Generate Roster and select the scope: All Units, Specific Unit, or Specific Pod. Choose the output format (screen, print, or PDF export). The roster lists each assigned inmate with their name, booking number, cell/bed location, classification level, and any special alerts (suicide watch, medical hold, etc.). Distribute printed rosters to housing officers for head count verification.
Mark a Bed Out of Service
When a cell or bed requires maintenance, select it from the unit floor plan and click Set Out of Service. Enter the reason and estimated return date. Out-of-service beds are excluded from available assignment inventory and displayed in gray on the occupancy dashboard until they are restored to active status.
Release a Bed Upon Inmate Departure
When an inmate is released, transferred, or moved to court, their bed assignment is automatically cleared through the release processing workflow. If a manual clearance is needed, locate the inmate on the roster, click End Assignment, and select the departure reason. The bed status immediately updates to Available on the occupancy dashboard.
💡 Pro Tips
- Always check the Separation Alerts panel before confirming any assignment — the system blocks obvious conflicts, but reviewing the full alert list prevents incidents from incompatible inmates housed in adjacent cells.
- Use the Classification Filter on the bed picker to quickly narrow available beds to appropriate security level — assigning high-classification inmates to minimum-security units creates serious safety and liability risks.
- Run a facility-wide roster reconciliation at every scheduled count to ensure the system matches physical head count — discrepancies must be investigated and resolved immediately per your facility’s count procedures.